Loader and Trucks Panel
For a live view of the trucking cycle, from and to multiple loaders, the Loader and Trucks panel is appropriate for both open cut and underground operations, and provides a live view of the trucking cycle—the movement of trucks from loading, to dumping, and then back to a single loaders.
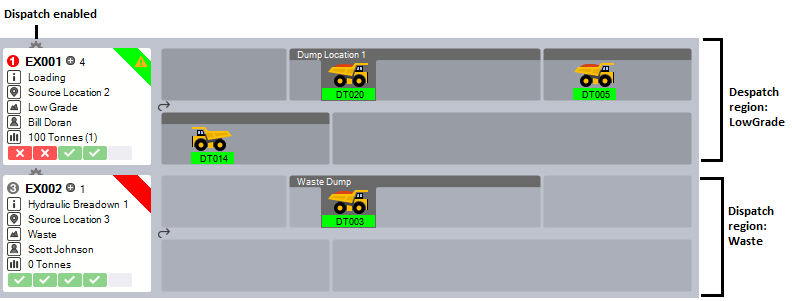
When the Dispatch System is enabled, the movement of trucks between loaders and around the trucking cycle will reflect the dispatch decision's that have been made based upon the defined inputs, weightings and constraints of the Dispatch system.
The steps in the cycle include hauling, queuing at the dump, dumping, travelling empty, and to complete the cycle, queuing back at the loader. Each step in the cycle for each truck, any change of status, and all associated measures, are recorded in the database.
For the Control Room Operator, this panel provides a critical view of the mining operation. If the site is running a:
- Voice system. The Control Room Operator receives calls from equipment operators and then make the appropriate truck movements around the cycle. All movements, changes in status, and measures are entered and saved as events in the database.
- Automated system. The equipment operators directly log events using mobile devices. As a result, the Control Room Operator will see an update of equipment movements, status changes, and measures, in the Loaders and Trucks panel and elsewhere.
Even in the case of an automated system, the Control Room Operator is able to intervene to change the status of a loader or to a truck, assign a loader or truck to a location, or enter measures, etc.
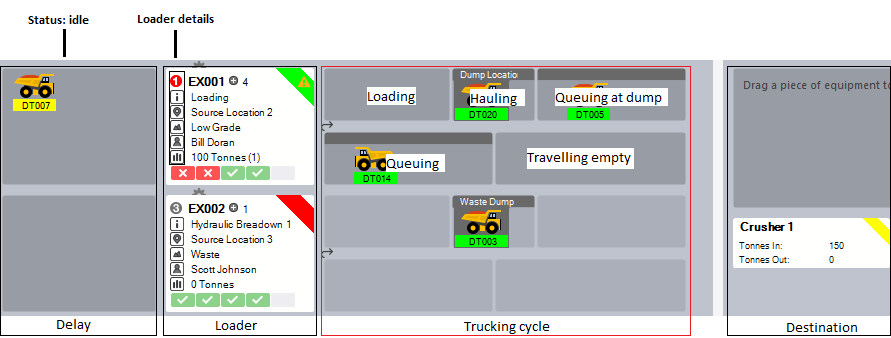
The icons that are used to define various types or models of equipment in the panel are configured in Reference Edit. The main areas of the Loaders and Trucks panel are described below :
-
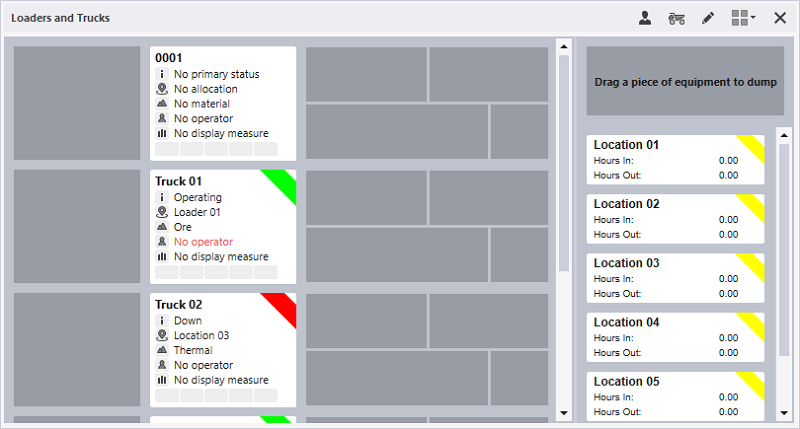
Delay. On the left side of the panel is the Delay area for trucks. Truck which have been allocated to a loader location, but which are in an Idle state (are being delayed for some reason), are shown here.
- Loader. The loader, its location, status, operator, etc. are shown here. The location of the loader defines the source of the material.
- Trucking Cycle. Trucks allocated to a loader location, move through the trucking cycle—loading material and moving it to its destination.
- Destinations. The destination of the material that is being hauled is shown here.
In the Loaders and Trucks panel, Loader Priorities, Dispatch Weightings, and Key Performance Indicators) all contribute to the dispatch decision-making process.
To create a Loaders and Trucks panel:
- Click the Panels tab of the Display pane.
- Right-click on the Loaders & Trucks panel type and select New Panel from the right-click menu
- Enter a Name for the panel, for example Loaders.
- Select from a list of Source locations, choose 'All Locations', or choose a predefined location reference group.
- Select from a list of predefined 'Loaders' equipment reference groups or individual Loading Units.
- Select from a list of predefined 'Trucks' equipment reference groups or individual Hauling Units .
- Select from a list of Dump locations, choose 'All locations', a predefined location reference group, or individual dump locations.
- Select the Dump Locations that will be displayed as individual icons in the panel.
- Select from a list of Materials for the loaders; choose 'All Materials', a predefined material reference group or individual materials to be displayed.
- Select the Data Entry Sequence for the panel - either Dump location then measure, or vice versa.
- Select the Cycle States for the cycle status panels to be displayed.
- Select the Displayed Measure. This is the code that will be used to display material movements in the panel.
- Select the Loader Dump Measure. This is the measure in which loader movements will be recorded.
- Select the Secondary Loader Dump Measures (optional) - the secondary measures to be made available for loader movements.
- Select the Truck Measure . This is the measure that will be used to record truck dumps.
- Select the Secondary Truck Dump Measures (optional) - the secondary measures to be made available for truck movements.
- Choose whether to Show the Enter Measures Dialog when a loader dump or a truck dump occurs.
- Select the Status Types for display in the panel; choose 'All Status Types' , a predefined Status Type reference group or individual status types.
- Select the Operator Role for the operator or select a default role from the drop down.
- Select the Travel Destination for truck trips to override the default travel destinations; select whether to use the Last Dump Location for Hauling Trucks and/or the Last Load Location for Travelling Empty Trucks.
- Click Finish to exit and create the new panel (or Cancel to exit without saving).
Note: The maximum number of locations that can displayed individually is 50. If you select any more than this, only the first 50 in the list will be displayed.
You can also view primary-secondary equipment allocations by configuring an Equipment Allocation panel.
To open a Loaders and Trucks panel:
- Click on the plus/minus box to expand the Loaders and Trucks node in the Panels tab of the Display pane.
The panels you have created will be listed underneath.
- Click the mouse on the name of a panel and drag and drop it onto an open Canvas.
- To view the panel in future, simply open the canvas.
You can add a panel to more than one canvas. A canvas may contain any number of panels.
For information on the options available in the toolbar for the panel, see Panel Toolbar.