Create Movie
![]()
The following parameters must be specified in the ![]() Create Movie form:
Create Movie form:
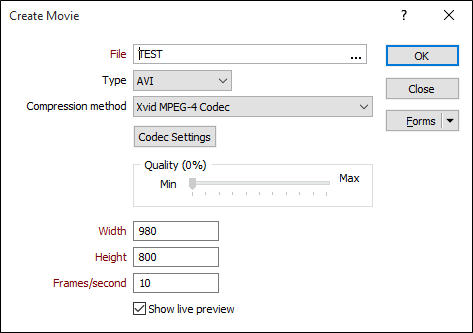
File
In the File input box, specify the name of the movie file. Double-click in the input box to change the default location.
Type
| AVI | Audio Video Interleave (AVI) is a special case of Resource Interchange File Format (RIFF). AVI is defined by Microsoft. The .avi file format is the most common format for audio and video data on a computer. |
Support for .WMV profiles has been discontinued. Some versions of Windows do not come with Windows Media Player installed. Due to this dependency the application may fail to load. AVI files encoded with a modern codec are the preferred option.
Compression
Video compression is a process that makes a movie file small enough to be manageable. Consider a four-minute full HD movie: uncompressed it would be nearly 42 GB (Gigabytes) in size. Compressed, it will easily fit on a CD. A video codec (coder-decoder) is a piece of software that carries out the compression process.
The available codecs will depend on your individual computer; for maximum AVI compatibility choose the Cinepak Codec by Radius option. This codec has been available on all Windows computers and media players since 1993.
If you create a movie using an obscure codec, it may not be compatible with other computers (unless they have the same codec).
Codec Settings
Click this button to configure Codec Settings prior to recording a flight path movie. Not all codecs have a configuration option. In those cases, the button is disabled.
Quality
The movie quality can be adjusted by moving the slider control between the Min and Max settings. The better the quality, the bigger the output file size.
Set the Quality slider to a level appropriate for the end-use: for small movies designed for on-line distribution, the slider should be around half-way; for high-quality videos, it should be set to somewhere between 80 and 90%. If your movie will be edited and re-recorded by other software, set the Quality slider to 100% to avoid unnecessary loss of quality.
Width, Height, Frames Per Second
Set the resolution of the video display by specifying a Width and Height in pixels.
There are many different ‘standard’ movie sizes, and the best choice will depend on your intended end-use for the movie. If you need to distribute it online, choose relatively small dimensions and a low frame rate. For full high-definition output, set the dimensions to 1920 (w) x 1080 (h) and the frame rate to 30 frames/sec, but be aware this will produce a much larger file.
The Frames per second setting controls how many frames per second are displayed during playback. Note that the speed of the flythrough is controlled by the time settings on the Options form, along with the number of viewpoints (if the time is set to Between Each VP mode).
Show live preview
A preview of the movie can be shown. You can speed up the recording process by disabling this option.
Forms
Click the Forms button to select and open a saved form set, or if a form set has been loaded, save the current form set.
OK
Click OK to create the movie file.