Using the Data Explorer
This section outlines the basic procedure for creating controls using the Data Explorer for viewing, editing and collecting when the required components have been added to the form - see Working with Data.
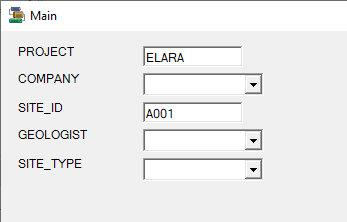
With the required data controls added to your form, the following procedure can be used to create controls and labels from the Data Explorer.
-
Configure the Connection
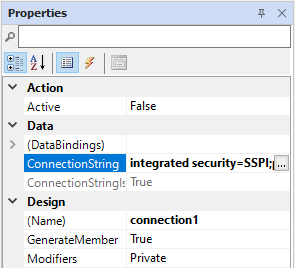
A connection to an application, server or site is required to access a data source. The connection process is outlined in Connection. When a connection has been made, to a source other than Geobank, the ConnectionString property will be populated.
-
Connect the Table
The connection that has been configured for the purpose must be associated with the Table instance for the data. To do this, select the Table control and set the Connection property in the Properties pane.
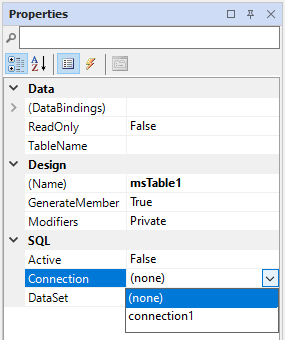
The DataSet must also be set for the Table control, using the DataSet property from the SQL section of the Properties pane.
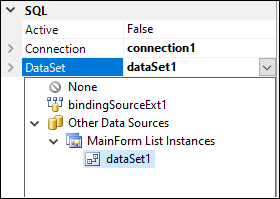
Once the Connection and DataSet properties are configured, the Table can be selected for the Table. To do this, from the Data section of the Properties pane, click the ellipsis in the TableName field. The Select Table dialog is opened with a list of the available tables for your Connection displayed.

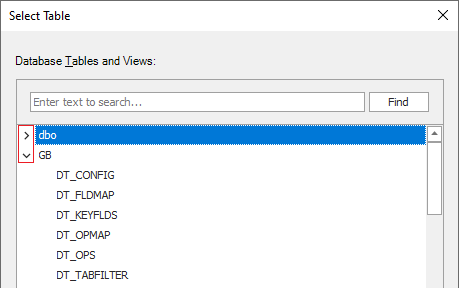
If you enter search text in the field provided, the tables displayed in the Select Table dialog will be filtered, with your search term highlighted.
The Find button will perform the search again.
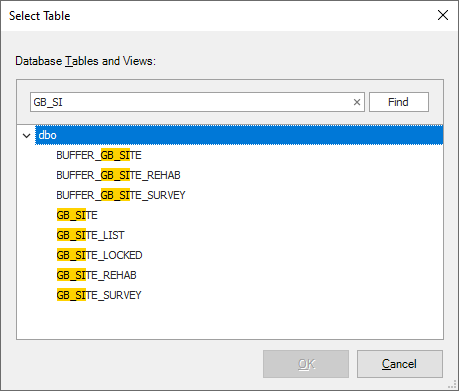
From the dialog, select the table you want to display in your form and click OK. The selected table will be listed in the TableName field.
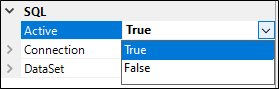
Importantly, set the Active property in the SQL section to True. This ensures that the data from the table is available to the BindingSource.
-
Connect the BindingSource
The BindingSource instance created for the data display must be associated with the correct data source. To do this, with the BindingSource selected, set the DataSource property in the Properties pane.

Next, select Table from the DataMember property.
-
Select the Columns
The Data Explorer pane lists the columns available in the data set/s you have configured for the Flow form. Columns can be selected from the pane and controls can be automatically created and added to the form.
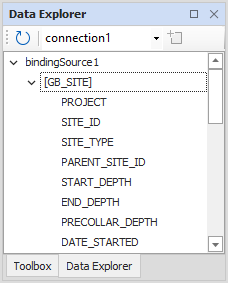
The Data Explorer pane displays the columns for the Binding Source selected in the drop down. If you have multiple BindingSource controls in your form, be sure to select the source you want to use to create controls
-
If you select a column or multiple columns displayed in the Data Explorer pane, and click Create, the Control Creation Options dialog opens.
-
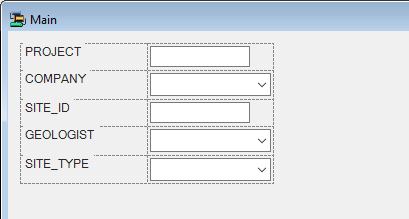
Click Create to add the controls and/or labels to the form, or click Cancel to exit.
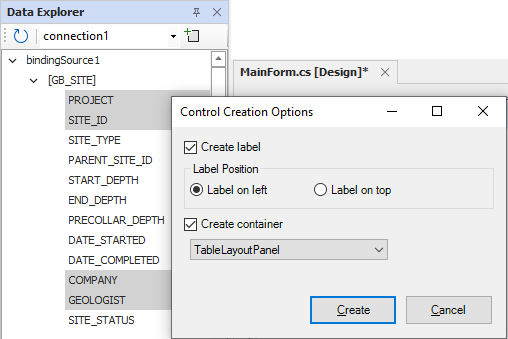
The Create label check box specifies whether a label should be created for each column selected for control.
The Label Position options are used to determine whether any labels created are placed on the left or on top of the associated control.
The Create container check box specifies whether a container should added to the form to hold the controls for the selected columns. If you want to use an existing container, make sure it is selected in the form - the new controls will be added directly into your chosen container.
If a container is to be created, you can select a FlowLayoutPanel or TableLayoutPanel from the drop down list.
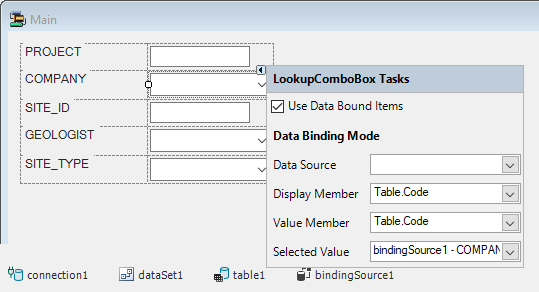
The settings for each control that has been created by the Data Explorer can be modified using the control properties. For example, select a control and click the control tasks icon:
Similarly, the properties for any container added by the Data Explorer can be modified using the control tasks.
If you run the Start Debugging process from the Debug menu in Flow Designer, a preview of the form will be displayed.