Custom Design Actions
How to create a Custom Design Action (CDA)?
Introduction
Custom Design Actions in Micromine Advance provide a framework which allows scripting to be used to write functions that interact with the layers in the Design Window and Design (Animation) Window.
A Custom Design Action (CDA) is a scriptable element that is halfway between a Context Menu Entry Point and a fully-fledged Design Action. CDAs allow the user of a script to be highly interactive with the data that lives in the Design and Animation panels of the application. CDAs also reuse many of the same user interface panels that normal design actions utilise, meaning that they offer much of the same functionality and interactivity, without much work on the part of the script developer/user.
CDAs provide script developer/users with:
-
the capability to implement, Design Selection, Selection Validation, Reversible Action Progress, Planar Transformation, Redo and Undo functionality, and the execution of Secondary Actions for complimentary inputs into Action options.
-
the capability to leverage the existing design action infrastructure in Micromine Advance to quickly create design actions that offer greater interactivity and usability. CDAs are quick to make, easy to change and are far more efficient to use than normal scripts.
Leveraging design selection functionality already implemented in the application means that selecting inputs and running actions is far more efficient. Complex and reusable features such as Planar Transformation, real-time selection validation, and Guided multi-step progression are some highlights of CDAs.
How to create a Custom Design Action (CDA)?
A CDA is created in a similar manner to ContextMenuEntryPoints. They can be created with a method that returns a CustomDesignAction class and has the [CustomDesignAction] method attribute. It is recommended that the action have the internal identifier to prevent it from showing up in the Scripts panel.
public partial class TestCustomDesignAction
{
    [CustomDesignAction]
	internal static CustomDesignAction TestDesignAction()
	{
		var customDesignAction = new CustomDesignAction("My Action", "This is a descripting of the action", "My Group", new Keys[]{});
		return customDesignAction;
	}
}
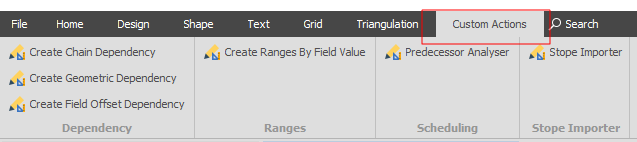
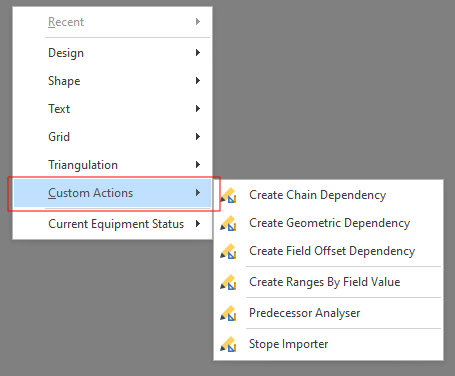
CDAs are created when scripts are compiled and are then available for selection on a Custom Actions ribbon when the Design or Design (Animation) window is open. The same actions are available for selection via the Design Window right click context menu:
There are a number of parameters that are needed to create a CDA. These parameters are necessary for creating unique actions that are fully functional with the keyboard shortcut infrastructure in Micromine Advance.
Name
Name of the action. Must be unique as it is used to define the keyboard shortcut of the action.
Description
Defines the description that appears on the tooltip of the action.
Group
Defines the name of the ribbon group which the action will be associated with.
Keyboard Shortcuts
Provides access to secondary design action such as GetPoint or GetVector. Secondary actions can be executed during a design action. It is recommended to pair the execution of a secondary action with a button press event from IOptionsForm.
Features
Design Selection
Design selection comes in two main forms, the underlying IDesignSelection interface that facilitates how the user interacts with the design panel, and the UI based DesignSelectionPanel which allows the user to define filters for selection.
IDesignSelection can be accessed through CustomDesignAction.Selection. It is recommended only to access this within the various Functions and Actions of the custom design action as it will only be created while a custom design action is active.
The selection can be used to change the current selection mode with Selection.SelectionMode which accepts values from the SelectMode enum. It can also be used to get the current selected elements and types with Selection.SelectedDesignElements and other similar methods.
Design Selection Panel can be enabled with CustomDesignAction.SelectionPanelEnabled, with filtering logic and validation messages being applied with CustomDesignAction.SelectionFilter and CustomDesignAction.SelectionFilterErrorMessage respectively.
The selection filter is a function that has an input of IDesignCollectionElement (the element the user has selected) and returns a boolean (defines if the element is valid). The function will iterate over all elements in the current selection and will be valid if ANY element returns true. The filter is executed each time the selection changes. The error message will show any time a selection has no valid elements.
customDesignAction.SelectionPanelEnabled = () => true;
customDesignAction.SelectionFilter = (element) =>
{
	var shape = element as Shape;
	if (shape == null)
		return false;

	return shape.Count > 1;
};
customDesignAction.SelectionFilterErrorMessage = () => "No shapes with two or more points in selection.";
Options and Action Settings
optionsForm.Options gives access to how we can get data from inputs in the actions form. optionsForm.Options.AddX where X is the type of data will allow you to access the different forms.
customDesignAction.Options = () =>
{
  //create the options form
  var optionForm = OptionsForm.Create("My Custom Design Action");

  //example check box
  var useToleranceCheckEdit = optionsForm.Options.AddCheckBox("Use Tolerance");
  //example layer selection where true/false represent if the user can select multiple layers
  var exampleLayer = optionsForm.Options.AddLayerSelect("Output Layer", false);
  //example file read
  var exampleFile = optionsForm.Options.AddOpenFile("Data File")

  //return the options form
  return optionsForm;
}
All .AddX commands can be followed with a .RestoreValue command to remember the setting the last time it was run.
 var useToleranceCheckEdit = optionsForm.Options.AddCheckBox("Use Tolerance").RestoreValue("IntersectPolygonsDesignActionUseTolerance", true, true);
 //note this is slightly different for layers
 var outputLayerSelect = optionsForm.Options.AddLayerSelect("Output Layer", false).RestoreValue<string>("IntersectPolygonsDesignActionOutputLayerSelect", (l) => l.FullName, (s) => Project.ActiveProject.Design.LayerData.GetLayer(s), true, true);
Validators can be used in some cases to display a warning or not let the user continue unless a requirement has been met, i.e. setting a layer as the output layer.
outputLayerSelect.Validators.Add(x => x == null? "Please select a layer." : null);
Action Settings
Functional Actions
The ApplyAction is what will happen when the Apply button is pressed. Due to the nature of having undo/redo functionality in the design space this will mostly be calculations/saving settings and won’t create/move points etc. If the action is meant to exit the CDA then it will return True, if the code is meant to be repeatable (you can hit Apply multiple times) return False.
customDesignAction.ApplyAction = () =>
{
	var inputShapes = customDesignAction.ActionInputs.Shapes;
	var settings = customDesignAction.ActionSettings;
	return true;
}
The CancelAction is what will happen if the script is action is cancelled while it is still running by pressing the Cancel button:
customDesignAction.CancelAction = () =>
{
		//any actions that might need to be undone on hitting cancel
}
The SetupAction can be used to set the initial selection method:
customDesignAction.SetupAction = () => customDesignAction.Selection.SelectionMode = SelectMode.SelectElements;
Progress Steps
Progress steps are the steps the user can follow to complete the action once it is selected. Below is an example of what appears when creating a shape:

The SelectAction can be used to define what happens when something is selected that matches the current SelectMode and will move to the next progress step:
customDesignAction.SelectAction = () =>
{
	var shape = customDesignAction.Selection.SelectedDesignElement as Shape;
}
The BackAction is what will happen if the user goes backwards in the progress steps, i.e. right-clicking:
customDesignAction.BackAction = () =>
{
    customDesignAction.Selection.SelectionMode = SelectMode.SelectPoint;
}
ProgressSteps are the text steps that will be displayed once the button is clicked:
customDesignAction.ProgressSteps = () => new List<string>() { "Select first point.", "Continue adding points, Right click when finished." };
ProgressStep can be used to determine which step the user is in. This can be helpful to activate different select methods within the SelectAction, i.e. Select a string → Select a point on the string:
customDesignAction.SelectAction = () =>
{
    if (customDesignAction.ProgressStep == 0)
    {
		customDesignAction.Selection.SelectionMode =  SelectMode.SelectShape;
		customDesignAction.ProgressStep = 1;
    }
    else if (customDesignAction.ProgressStep == 1)
    {
		customDesignAction.Selection.SelectionMode =  SelectMode.SelectPoint;
		customDesignAction.ProgressStep = 2;
    }
}
Undo and Redo
The RedoAction is where most of the results are written. If the custom design action is writing shapes to a layer, they will be written here. This action is called if the user presses CTRL + Y after undoing it with CTRL + Z. Most Undo and Redo actions should be contained within the ApplyAction so that any static variables can be stored correctly for undo actions if the action is called more than once.
customDesignAction.RedoAction = () =>
{
	var layer = (Layer) customDesignAction.ActionSettings[0].Value;
	var output =  customDesignAction.ActionOutputs.Shapes;

	foreach (var shape in output)
		layer.Shapes.Add(shape);
};
The UndoAction is where anything that is done in the RedoAction is undone. This action is called if the user presses CTRL + Z.
customDesignAction.UndoAction = () =>
{
	var layer = (Layer) customDesignAction.ActionSettings[0].Value;
	var output =  customDesignAction.ActionOutputs.Shapes;

	foreach (var shape in output)
		layer.Shapes.Remove((Shape) shape);
};
Secondary Actions
Assign to Option Button
The GetVectorAction secondary action can be used to save the bearing/grade of a vector. This has similar functionality to the 3 dots visible in other places in the application.
var directionSelect = optionsForm.Options.AddVector3DEdit("Direction");
var buttonGetDirection = optionsForm.Options.AddButtonEdit("Set Direction");
buttonGetDirection.ClickAction = (o) => customDesignAction.SecondaryActions.GetVectorAction((complete, vector) => {
	if (complete)
		directionSelect.Value = vector;
});
GetPointAction
var buttonSelect = optionsForm.Options.AddPoint3DEdit("Point");
var buttonGetDirection = optionsForm.Options.AddButtonEdit("Set Point");
buttonGetDirection.ClickAction = (o) => customDesignAction.SecondaryActions.GetPointAction((complete, point) => {
	if (complete)
		buttonSelect.Value = point;
});
Visibility
Shows whether the action will be visible or not.
customDesignAction.Visible = () => true; //visible
	customDesignAction.Visible = () => false; //invisible
	customDesignAction.Visible = () => customDesignAction.ActiveCase != null; //visible only if there is an active case (ie. in the animation, not in design)
Hotkeys
The hotkeys that can be pressed to launch the design action.
new Keys[] { Keys.Control | Keys.O, Keys.D }