Manage Connectors & Applications
On the Services ribbon: Select System | Administration | Manage Connectors & Applications to display a tree structure which shows the Connectors, Sites and Applications that are configured as part of the Pitram Portal installation.
![]()
Expand the site node, then click on an application node to display the configuration settings.
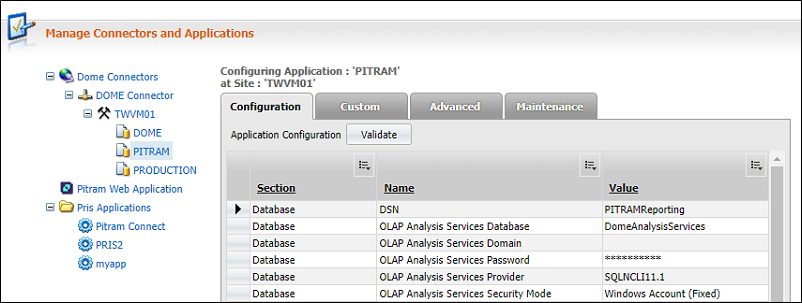
The highest node in the tree structure on the right pane is the Pitram Portal Connector.
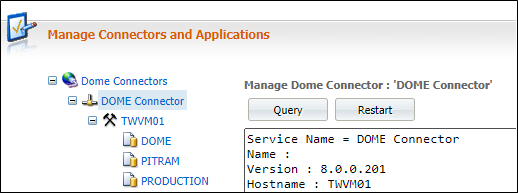
At this level there are two buttons:
- Query. Select Query to view current details of the Pitram Portal connectors - version, hostname, applications, etc.
-
Restart. Select Restart to restart all of the connectors.
If connection does not occur, you may have to do the following:
- On the Start menu, go to the Control Panel.
- Select Administrative Tools | Services.
- Navigate through the list to locate Pitram Portal Connector.
- Click Restart.
You should now be able to access Pitram Portal.
Tabs
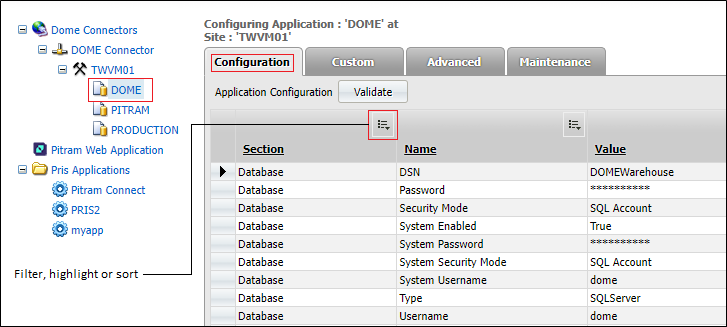
If you select Pitram PORTAL, Pitram or PRODUCTION nodes in the tree, you will find the window is made up of a number of tabs - Configuration, Custom, Advanced and Maintenance.
Pitram Connectors and the tagging system
If you are establishing a tagging system, you need to establish a relationship between Pitram and the installed third party Mine Radio System (MRS). This can be achieved in Manage Connectors & Applications | Pitram
Make sure that the following relationships are established:
| Section | Name | Value |
|---|---|---|
| Module: MRS Integration | Is Enabled | True |
| Module: MRS Integration | MRS Database Name | Site defined |
| Module: MRS Integration | MRS Database Password | ********** |
| Module: MRS Integration | MRS Database Port Number | Site defined |
| Module: MRS Integration | MRS Database Server Address | Site defined |
| Module: MRS Integration | MRS Database Username | Site defined |
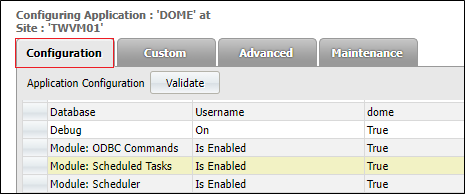
Configuration tab
The Configuration tab opens by default. This tab includes the following options:
- Validate.
- Filter, highlight or sort column. On the far-right of each column, click the appropriate icon to define a filter to highlight particular items in the column. Also, select whether to sort in either ascending or descending order, or to leave the list unsorted.
- Add. Select this option to add a new configuration setting to the grid. Select an option from the drop-down list of Section, Name and Value.
- Remove. Removes the selected record from the grid.
- Edit. Double-click on each record or row to display and edit configuration settings. Alternatively, use the arrow buttons to move between the first and last records. Click the Edit button to edit the current record.
Custom tab
Select the Custom tab to enter a custom command. While most tasks will have been configured as commands in the Advanced tab, there may be other one-off commands you need to execute for diagnostic or testing purposes.
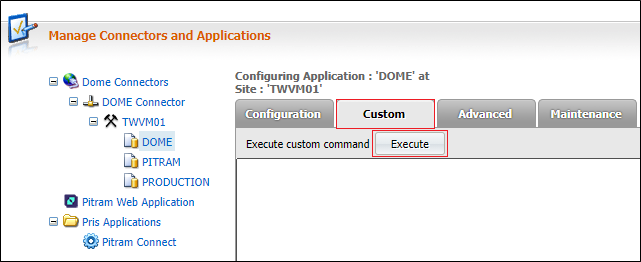
Click Execute to run the command you have entered.
Advanced tab
Select the Advanced tab to execute a command that has been configured to perform a specific application management task, such as reprocessing shifts.
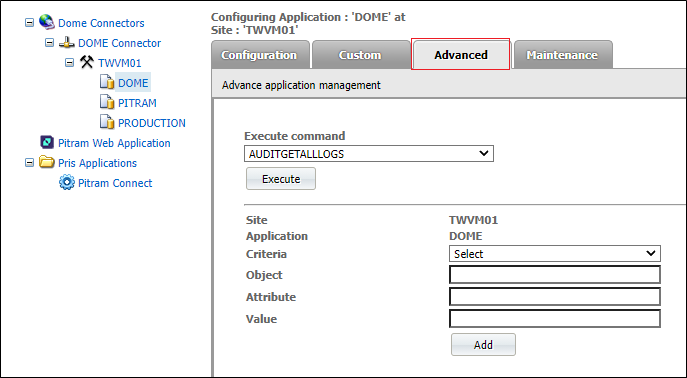
For example, you might want to run Validate to identify discrepancies in your data.
Maintenance tab
Select the Maintenance tab to run an update application database command. Click Upgrade to update the application database.

Restart the connectors
A Pitram Portal connector defines how a client's application data and web services are configured and accessed via the Pitram Portal Server. If data is stored and accessed across multiple sites, more than one connector may need to be configured.
From the Start menu, select Control Panel, then select Administrative Tools | Services. Navigate through the list to locate the Pitram Portal Connector and select Restart.
Scheduled Tasks Refresh Interval
Scheduled Task Refresh Interval defines the time interval that the system uses to regularly check if any tasks are scheduled to be run. The tasks that are scheduled to be run are listed and defined in Manage Scheduled Tasks.
To define the refresh interval the following must be defined:
- Section = Module: Scheduled Tasks.
- Name = Scheduled Tasks Refresh Interval.
- Value = The Refresh Interval time measured in milliseconds. For example 10000 = 10 seconds.
If the Module is not defined, the default Refresh Interval is set to 30 seconds.
How to define the Module
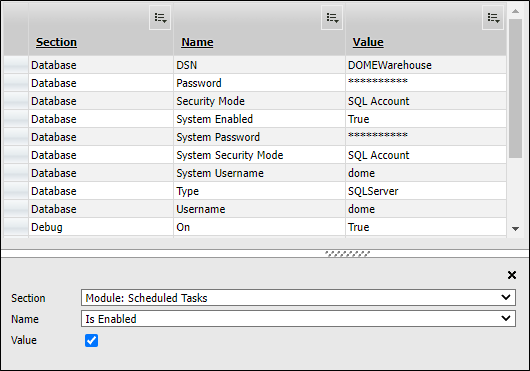
To define the module, do the following:
- Make sure that you have selected Pitram Portal Connector | Site Name | Pitram Portal on the workspace.
- Select the Configuration tab.
- Click Add on the bottom-left of the dialog.
-
Use the drop-down arrow on the far-right of each option to select the following:
Section Module: Scheduled Tasks Name Scheduled Tasks Refresh Interval Value 10000
For example.
- Click OK.
The defined Value is the Refresh Interval.
It is recommended that the Refresh Interval be smaller than the repeat interval defined for the task. The latter is the defined Repeat every value of the Scheduled Task.
The relationship between the task Refresh Interval and the Scheduled Task Refresh Interval is demonstrated by the example below:
Schedule Refresh Interval = 20 seconds.
Run time of the task = 25 seconds. Thus, after 45 seconds the task would be rerun (20 (interval) + 25 (runtime) = 45).
Scheduled Refresh Interval = 10 seconds. Thus, the system would check at 10, 20, 30, 40 and 50 seconds.
At 50 seconds the system would see that a task was scheduled 5 seconds ago, so the scheduled task would be rerun.