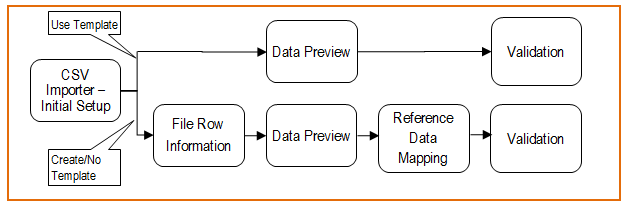
Running the Import wizard
The CSV importer is a generic tool which can be used to import Location reference data, Drill and Blast Design data, and Drill & Blast Ring data. If you choose, you can import data using a template created for generic or individual use. If you are importing data for completely new locations there will be a minimum of two imports: The first is to import the location data, and the second is to import the design data. For underground locations, a third import for sub-location data may be required.
Use the Import button on the Drill and Blast header to import drill and blast data and optionally create a template that can be applied during future imports. Data may be imported from a comma separated value (.CSV) file or from existing Reference Data.

- Click Browse and select a .CSV file to import.
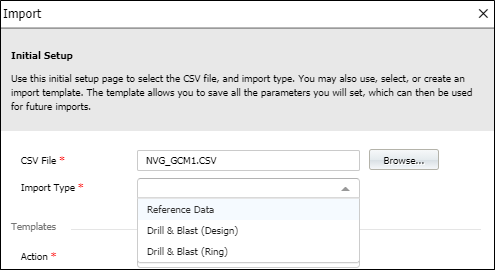
Unless you are using the Import utility to delete a template (See below) this is a mandatory input and you cannot proceed until a file has been selected.

- Select an Import Type from the drop down list provided.
| Option | Description |
|---|---|
| (None) | Set automatically when deleting a template. |
| Reference Data | Select this option to create or update locations that must exist in the Reference Data tables used by Drill and Blast. (This option can also be used to import data that is used outside of Drill and Blast.) |
| Drill and Blast (Design) | Select this option to import Design Data that pertains to the total location. |
| Drill and Blast (Ring) | Select this option to import design data for any sub-location which makes up the total location. One or more sub-locations will be fired which contribute to the material available at the location. |
Surface mining (i.e. by block) will not require the import of sub-location design data.
- Select an Action from the drop-down list provided.
You can choose not to use a template, choose to create a template, or choose to use or modify a Template associated with the data being imported.
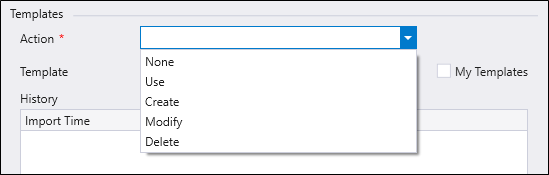
Any template you create is saved as a global template. Select the My Templates check box to filter the template list to only show the templates you have created.
The template name must be unique.
Option Description None Template functionality won’t be used during import, in this case, users need to fill in the row information and select mapping columns. Use Select and use any of the existing templates. When this option is selected, the user will be navigated to the Data Preview page and then to the validation page. Create Creates a new template using mappings selected during a successful import. Modify Select and modify existing templates. When this option is selected, parameters from the template are preselected in all wizard pages. All changes will be saved for this template. Delete Delete the selected template. A Delete button will be enabled alongside the name of the template you select for deletion. Click the button to delete the template. 
The History grid displays information on the imports performed previously.

- When you have set the parameters for the import and optionally selected or created a template, click Next to continue.
-
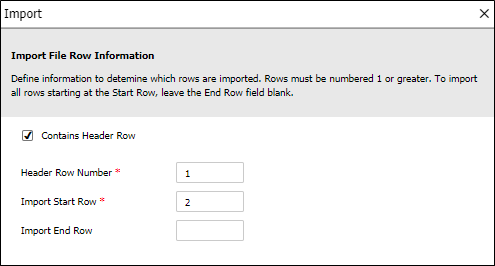
Specify whether or not a Header Row exists in the CSV file you are importing, and if so, set the Header Row Number.
The Start Row and End Row parameters can be used to import a subset of the rows in the file. If you are importing all rows, End Row can be left blank.
-
Click Next to continue.
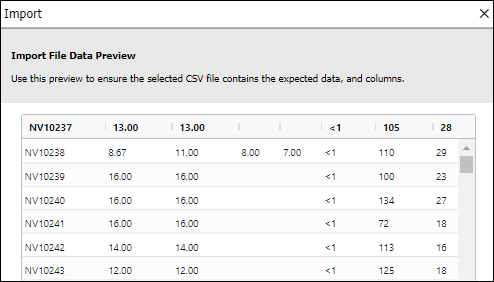
- A Data Preview screen allows you to preview the data that will be imported from the CSV file you have selected.
- If you are happy with the preview, click Next to proceed with the import. Otherwise click Previous to revisit the parameters you have set.
Reference Data Mapping
-
If you are importing Reference Data, select the Reference Group you are importing to:
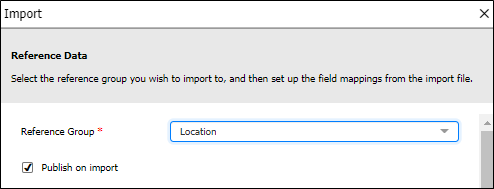
If selected, the Publish on Import check box option may help to speed up processing by not publishing the updated reference data. This only becomes an issue where there are a very large number of locations in a multi-site environment.
If the Publish on Import check box is not selected, you will need to manually publish at some point, otherwise Pitram applications will not be updated with the new or modified reference data.
Unless you are using a template (in which case the columns in the CSV file are already mapped) you will need to map the columns in the CSV file to the fields in the Drill and Blast reference tables.
-
Mandatory attributes are marked with an asterisk * and must be mapped. The columns you need to map will depend on the type of import you have chosen.

-
Once you have mapped the columns in the CSV file, click Next to proceed with the import.
Validation
- During the Import process the results of a Validation check are displayed:
- Overwrite Select this option to overwrite rows with the same key (remove duplicates) when records are imported.
- Ignore fields with errors The Import process cannot proceed unless you resolve or choose to ignore the reported errors. For the Import button to be enabled there must be at least one valid record.
- Finally, click Import to complete the Import process.
The total number of records to import, the number of valid records, and the number of errors encountered are reported.

If errors are encountered the Import process cannot proceed. You may need to check that the necessary columns and reference tables have been setup. You can return to previous configuration using the Previous button.

There are two check box options: