How to configure a Mobile device
In the following example we will be configuring a Mobile unit to work with a service equipment unit. This task will usually be undertaken by an Administrator who has already configured Mobile in Reference Edit. In the following steps we will be using the keypad on the touch screen on the mobile device (a keyboard may be attached to the Mobile device in order to complete the configuration).
-
The Pitram Mobile window will be displayed with the red power icon in the centre.

-
Move the mouse over the power icon and it will change colour to (blue) and be labelled Administrator.
-
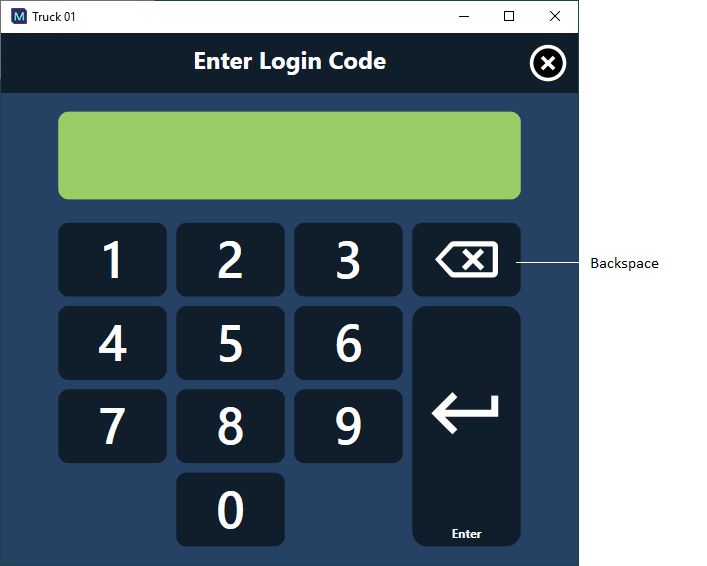
Click on the Administrator label to open the Enter Admin Code window:
-
Use the keypad to enter a code in the following format:
24[day][month]
For example, if it is 11 August, the Admin Code = 241108
Use the backspace key (<- )to delete the last digit if necessary.
-
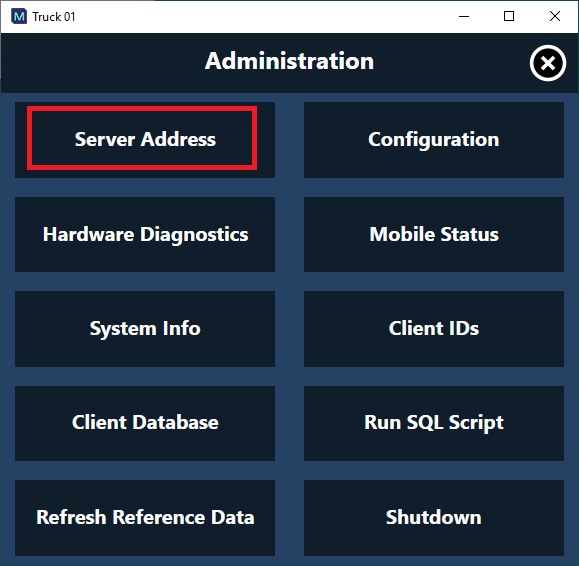
Click Enter to open the Administration dialog. The following options are provided:
| Option | Description |
|---|---|
| Server Addresses* | (Mandatory) You must define the four Pitram services addresses that Mobile needs in order to access the Reference Edit configuration. |
| Diagnostics |
Restart all devices. Click to ascertain that all attached devices, such as GPS or on-board telemetry, are responding. Click on the Global Position System and PLM buttons to see details of the connection. This may help identify any connection problems. |
| Equipment Name* | (Mandatory) You must assign a particular equipment unit to this Mobile unit. Once the server addresses and the equipment name have been defined for the Mobile unit, the system is able to associate the unit with the metrics that need to be recorded for that type of equipment. |
| Refresh Reference Data | Update the Reference Data to ensure that the latest site configuration is available to the Mobile unit. |
| Client Register | A list of the currently connected Mobile units |
| Shutdown | Close Mobile. |
| OK | Save your settings. |
-
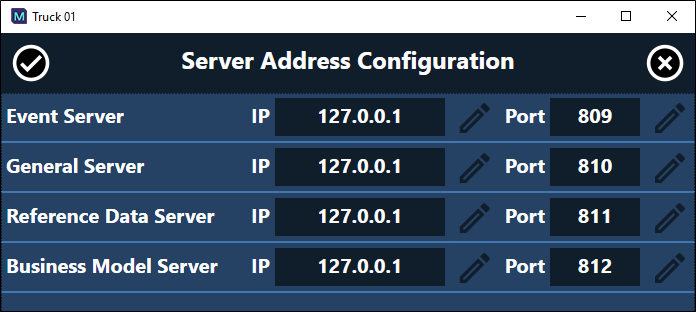
Click the Server Addresses button to open the following dialog:
-
All four services will have the same address but have different port numbers. The service address comprises two parts:
-
Server Address.
-
A UNC path.
For example, mm00111, or
-
An IP address.
For example, 10.0.60.111.
-
Port Number.
This is always a numeric. The default values are usually 809 through to 812, however these values may vary at different sites.
This can be either:
The Set button displays an alphanumeric keypad for those who do not have access to a keyboard.
-
Click OK to save the settings and close the dialog. You will return to the Administration window.
-
Click on Hardware Diagnostics. The Diagnostics dialog is only applicable to sites that use VIMS, PLM, TRIPS or GPS.
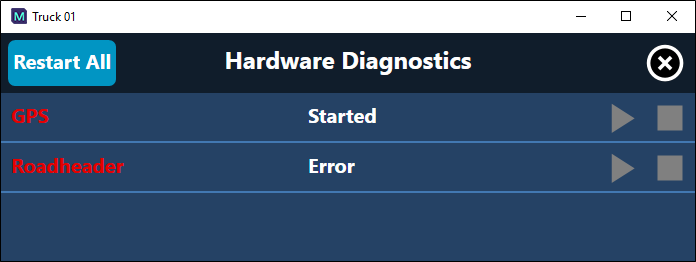
The GPS and the PLM settings are defined in Mobile GPS Profile and PLM2 Profile in Reference Edit.
-
Click OK to return to the Administration screen.
-
Click on Equipment Name to open the Equipment dialog and enter the name of the equipment unit (e.g. Truck1) for which the Mobile unit is being installed.
While you must specify the server addresses and the equipment name, other settings may not need to be changed, but can be used by an Administrator to verify connection parameters and for problem diagnosis.
-
Click OK to save your settings and return to the Administration screen.
-
Click Refresh Reference Data. This will get the most recent version of the reference data—the latest equipment names, for example.
-
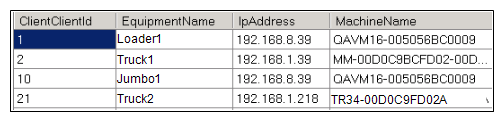
Click Client Register to display the equipment currently connected to the server and their connection parameters:
-
Click OK to return to the Administration screen. The configuration of Truck1 has been completed.
-
Click Shutdown (or press F2) and wait for the Mobile window to close. If you try and start Mobile too soon after shutdown, you may receive a message saying that Mobile is already running. Wait a minute or two and try again.
-
Start Mobile again. The Mobile screen is now configured for Truck1. The Destination, Cycle and Material of the truck, if they have been defined in the database, are shown on screen.