Create Movie
![]()
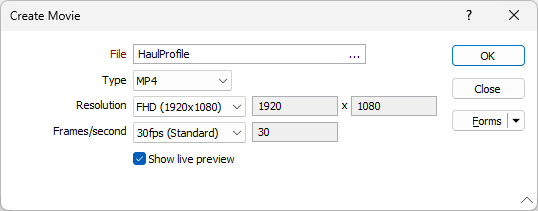
The following parameters must be specified in the Create Movie form:
Note: This Create Movie tool is used for making films from Flight Paths. For information on creating a movie from a Schedule, see Create Movie in the Scheduling section.
File
In the File input box, specify the name of the movie file. Double-click in the input box to change the default location.
Type
Use the Type drop down to select either an .MP4 or .WMV profile for the video.
|
MP4 |
The MPEG-4 Part 14 (MP4) format is most commonly used for video and audio. MP4 is a popular video format which supports streaming over the Internet. .MP4 is the only valid extension for MPEG-4 Part 14 files. |
|
WMV |
Windows Media Video is a number of video codecs and corresponding video formats developed by Microsoft®. WMV uses the Advanced Systems Format (ASF) container format to store video and audio content. |
Resolution
Select the spatial resolution for the video from the drop down. Various resolutions are supported:
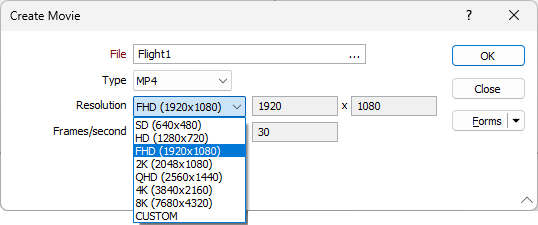
There are many different ‘standard’ movie sizes, and the best choice will depend on your intended end-use for the movie. If you need to distribute it online, choose relatively small dimensions and a low frame rate. For full high-definition output, set the dimensions to 1920 (w) x 1080 (h) and the frame rate to 30 frames/sec, but be aware this will produce a much larger file.
If you select CUSTOM from the drop down, you can set the resolution using the Width and Height fields provided.
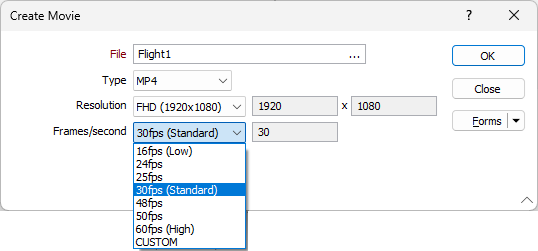
Frames/second
The Frames per second setting controls how many frames per second are displayed during playback.
Note that the speed of the flythrough is controlled by the time settings in the Options form, along with the number of viewpoints (if the time is set to Between Each VP mode).
Various standard frames/second settings are supported. If you select CUSTOM from the drop down, you can set the frames per second using the field provided.
Show live preview
A preview of the movie can be shown. You can speed up the recording process by disabling this option.
For information on creating a video file from a Scheduler animation, see Create Movie.
Forms
Click the Forms button to select and open a saved form set, or if a form set has been loaded, save the current form set.
By design, the Forms button is not available for loaded Vizex layers (i.e. when opening the form set properties of a layer in the Vizex Layer Display pane). In Vizex, the Forms button is only available for new forms opened via the Home tab or the Vizex tab, in the Layer group (or by double-clicking on a form type node in the Vizex Layer Types pane).
Save and Save As
Click the Save button to save the changes you have made to the form set. Click Save As to save your changes as a new form set. Save As will default to the first available form set number.
Reset
Click Reset to clear the form of all values and reset the form to its default state.
Reset Tab
For tabbed forms, select Reset Tab to clear the active tab of all values and reset the tab to its default state - without making any changes to other tabs in the dialog.
Undo and Redo
Click Undo (CTRL + Z) to undo recent changes in the form. After an Undo, click Redo (CTRL + Y) to restore the last change that was undone.
Collapse
Collapse (roll-up) the form to preview a chart, or preview the results of an operation in Vizex, or obtain input values from Vizex, the Property Window, the File Editor, or the Plot Editor.
OK
Finally click OK to create the movie file.