Material Bin Set
A Material Bin Set allows the creation of material bins that pertain to different material types in a block model. Each block that falls fully, or partially, inside a wireframe is categorised as a “material type” defined by the material set.
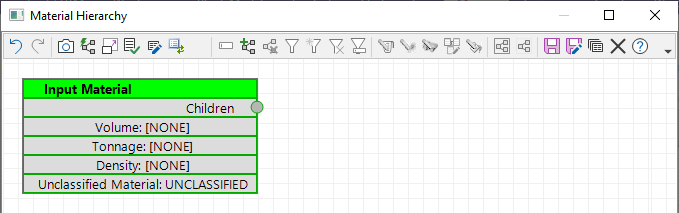
When a material bin set is created, (view or edited) the material hierarchy window is displayed. This window provides a canvas for adding and configuring the properties of material bins.
A mandatory “Input Material” node is added to the canvas by default to handle any material excluded by the material bin filters that are subsequently created. If material does not fit the condition for any material bins, that material is categorised here as unclassified material.
Each material bin you add must possess a unique name and filter condition. The classification of different materials is based on the filter associated with each material bin AND the hierarchical relationship between all the bins in a set.
Hierarchy relationship between bins
During interrogation a top-down hierarchy is used to evaluate the material bins in a set.
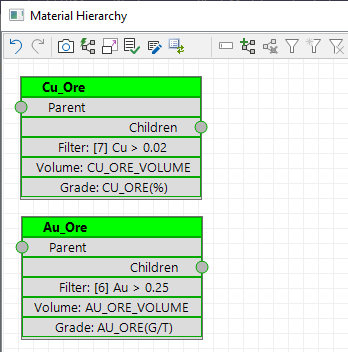
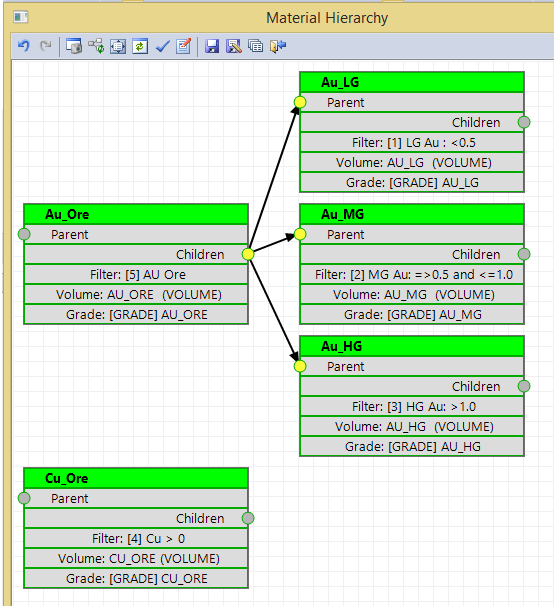
To understand the underlying principle, consider the example (below) of a model with two elements, Au and Cu. The Material Hierarchy window provides a diagrammatic view of material classifications.

An ore block must be classified as either AU_ORE or CU_ORE or neither. A block cannot be classified as both AU_ORE and CU_ORE since this leads to doubling up of volume. Therefore, a top down hierarchy is used to evaluate material bins.
A material bin positioned at the top of the material hierarchy canvas (AU_ORE in this example) is evaluated first. The element associated with this bin is referred to as the Primary Element.
The material type is positioned “lower” in the material hierarchy canvas (CU_ORE in this example) and will only be considered if the block does not meet the filter condition for AU_ORE. If the vertical order of the bins is switched so that AU_ORE bin is positioned below the CU_ORE bin in the hierarchy, then a block could only be classified as AU_ORE if it did not pass the CU_ORE filter.
Each block from the block model (that is inside the wireframe) will be categorised according to the above rules. The volume of all the AU_ORE and CU_ORE blocks (inside the wireframe) is accumulated and a weighted average grade is calculated.
If material does not fit the condition for any material bins, that material is categorised as unclassified material using the default Input Material bin.
The final volume and grade values for each material bin can be written to the wireframes as attributes.
Where is the Grade field defined?
It is not immediately obvious, but until now we have not properly associated a Material Type with a grade field in the block model. It seems that the filters we have used should provide that information. But the filter can potentially be more complicated than just a grade cutoff definition. Because a filter is generic, there is no way for the function to know which “part” of the filter definition (if any) represents the grade field.
It is worth mentioning that the filters used in the Material Bin Set must be compatible with the Block Model file. If, for example, you select a filter that references a non-existent field in the block model, the material type box will turn red. Place the mouse over the title bar to produce a help bubble explaining the problem.
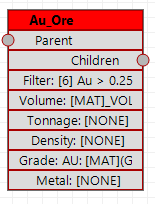
The Attribute Definition is discussed in more detail later, but for Grade there is an option to “Bind” the Material Type to a specific (grade) field in the block model file.
This establishes which grade field will be used for the (weighted average) grade calculation.
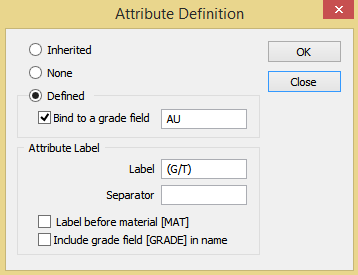
This grade field must also be selected in the Grade Field column of the grid list
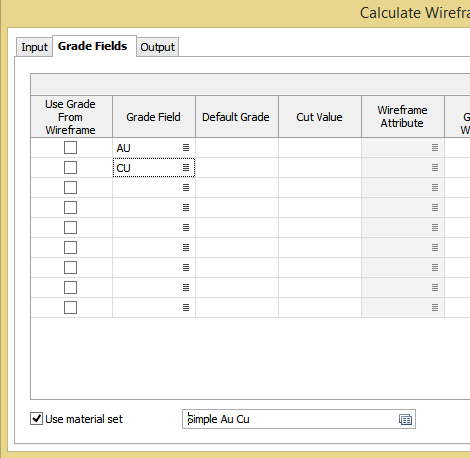
If you do not “Bind” the Material Type to a specific (grade) field then each of the grade for each of the grade fields (in the grid list) will be calculated each material type.
The following Material Bin Set does not bind the grade field (the clue is that the term [GRADE] appears in the Grade attribute name).
If both Au and CU are chosen in the Grade Fields group list, then the following grade attributes will be populated:
| Grade Attribute | Calculated Grade |
|---|---|
| AU AU_ORE | Weighted average AU from all AU_ORE blocks |
| AU AU_LG | Weighted average AU from all AU_LG blocks |
| AU AU_MG | Weighted average AU from all AU_MG blocks |
| AU AU_HG | Weighted average AU from all AU_HG blocks |
| AU CU_ORE. | Weighted average AU from all CU_ORE blocks |
| CU AU_ORE | Weighted average CU from all AU_ORE blocks |
| CU AU_LG | Weighted average CU from all AU_LG blocks |
| CU AU_MG | Weighted average CU from all AU_MG blocks |
| CU AU_HG | Weighted average CU from all AU_HG blocks |
| CU CU_ORE. | Weighted average CU from all CU_ORE blocks |
Edit and Report View
When you edit a Material Bin Set (from the right click menu), the diagrammatic representation is in Edit View.
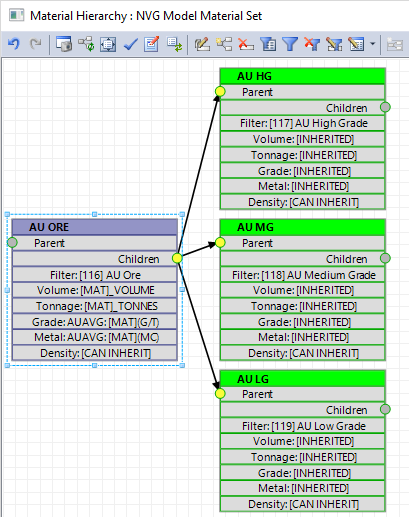
Edit View shows all available attributes and also shows how the attribute name will be constructed. Text in square brackets has special meaning. [GRADE] will be substituted with the name of the grade field, and [MAT] will be substituted with the name of the material type (The header line, in green, is the name of the material type).
The Report View only shows the attributes that will be generated. Where possible the actual name of the attribute is displayed. In the example above, there is no binding Grade field defined, so there can well be multiple grade attributes for each material type.
The following tools are available on the toolbar of the Material Hierarchy window:
|
|
Click Undo (CTRL + Z) or Redo (CTRL + Y) to rollback or restore the last editing change. |
|
|
Click the Create Image button to generate a screenshot of the Hierarchy diagram. |
|
|
Use the Arrange tool button to align each parent node to the Centre or the Top of its group. In the example diagram (above), a Centre alignment is shown. |

|
A Fit to Window button can be used to fit the Stratigraphic Sequence to the Display window. |
|
|
Click the Validate button to validate the contents of the current field. |
|
|
Click the Notes button to add textual information that may help clarify the Material hierarchy and how it relates to the underlying data. |
|
|
Click Rename to rename the selected node. |
|
|
Click Add Parent Node to add a parent node for the selected nodes. |
|
|
Click Delete Materials to delete the selected material nodes. |
|
|
Click Choose Filter to choose a filter for the selected materials. |
|
|
Click Create Filter to edit a filter for selected materials. |
|
|
Click Delete Filter to delete the filter for selected materials. |
|
|
Click Use Filter Name to use the filter name as a material name. |
|
|
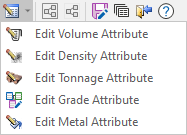
Use the options on the Edit Attributes drop-down menu to edit the attributes of the selected materials. |
|
|
|
|
|
Click Group to group selected materials. |
|
|
Click Ungroup to ungroup the selected group. |
|
|
Click the Save button to save the changes you have made to the Material hierarchy. |
|
|
Click the Save As button to save the Material Hierarchy as a new form set. |
|
|
Click the Forms button to load a new Material Hierarchy form set. |

|
Click the Close button to close the Material Hierarchy form and return to the main form. |
|
|
Click Help to display help about the Material Sets Hierarchy. |
Additional Detail
Each material type can be subdivided into “bins”. We will use AU_ORE to illustrate this.
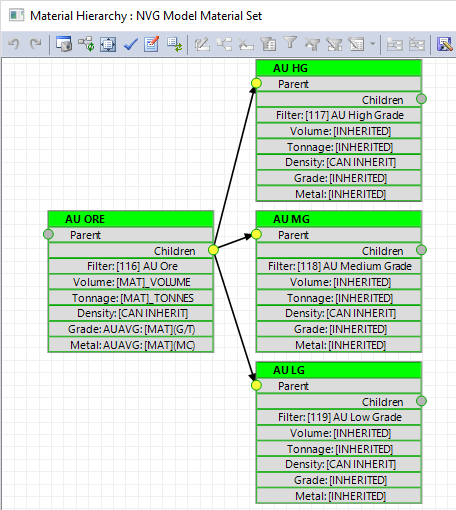
In the example above the material type AU_ORE works in the same way as previously discussed (looks at all blocks where Au is greater than 0.25). But here AU_ORE is also split into three separate bins; LG, MG and HG, with the content of each bin being defined by a filter AND the vertical hierarchy.
The terminology used by the Material Bin Set is that AU_ORE is a Parent material type and AU_LG, AU_MG and AU_HG are child material types. So once a block is classified as AU_ORE it then tries to determine a secondary classification, starting with the topmost “child”. Since the Parent excludes grades below 0.25 the AU_LG filter can simply be defined as grades below 0.5. This means that any blocks with an Au value in the range 0.25 to 0.50 will be classified as AU_LG. Since this is topmost in the vertical hierarchy, only grades above 0.5 will pass down to the MG filter. Similarly, only grades excluded by the LG and MG filters pass to the HG bin.
Considering this in terms of the Scheduler, AU_ORE might be the basis of the “objective” used by the optimisation process. The AU_LG, AU_MG and AU_HG bins might be included in the report generated by the optimisation process.
Any attributes defined in the material hierarchy are automatically added and populated to the input wireframe(s). For the scheduler scenario, these wireframes will be mining blocks and the values generated will be based on the intersection of each mining block with the input block model.
To summarise, for each wireframe (mining block) blocks, from the block model that are fully or partially inside the mining block, are categorised in terms of the material set. The attributes defined for each material type are summed (or averaged) to produce a final value that is written to the mining block wireframe.
The top to bottom hierarchy ensures that there is no overlap between parents. It is important to realise that even though the filters are based on grade cutoffs, the material types (and any “child” bins) are simply volumetric regions in the wireframe.