Import Text
![]()
On the Input tab of the form, you can determine the location of field and unit definitions in the Input file and map those units to the corresponding fields in the Output file.
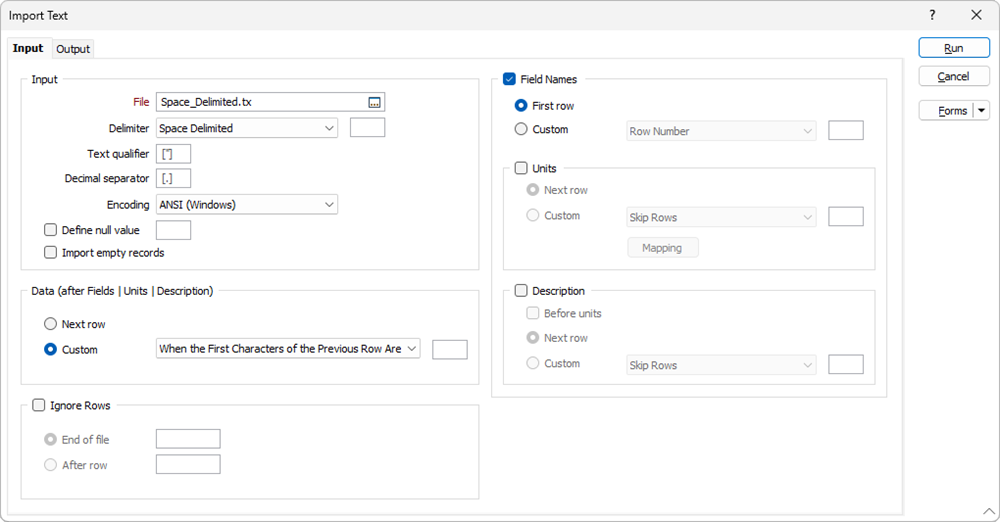
Input
File
In the Input group, click the File selection icon (double-click or F3) to navigate to the location of the (*.csv, *.tab, *.txt) Input file.
Delimiter
Delimiters are ASCII characters used to separate one text field from
the next. Specify the Delimiter for the
If you chose the Custom Delimiter option, specify a delimiter character in the field provided.
Notes: When the field delimiter is a space character, multiple consecutive space characters count as a single delimiter. For any other field delimiter (e.g. tab or comma), multiple consecutive delimiter characters count as multiple delimiters.
When the field delimiter is a tab any combination of space and carriage return characters at the start and end of a field are stripped away. For any other field delimiter (e.g. space or comma) any combination of space, tab and carriage return characters at the start and end of a field are stripped away.
Text Qualifier
When one or more of the fields to be imported could potentially contain the specified (comma, space or custom) delimiter character, a Text Qualifier can be used at the start and end of those fields (typically double or single quotes) to denote that the delimiter character is meant to be included as part of the field.
Decimal separator
The separator that is used to denote decimal values may vary depending on locale. A decimal point is the default. If necessary, specify an alternative separator.
Encoding
The default encoding for the input text

Define Null Value
If required, enter a value in the Define Null Value field representing NULL in the file. Note that this is a string value (for example a null value of -999 will not match -999.0 in the file).
Import Empty Records
Select the Import empty records check box option to import files which contain empty (yet valid) records. Empty records in a file will be ignored when this option is not selected.
Data (after Fields | Units | Description)
The default Next Row option indicates that the data in the file begins on the next row after the Fields, Units and Description information.
Alternatively, select the Custom option and use the Location drop down to select the location of data in the file - after the Field Names, Units and Description information.
")
-
Skip Rows - enter the number of rows to be skipped in the field provided.
-
Row Number - enter the row number at which data in the file begins.
-
When the First Characters of the Row Are - enter the first characters of the row at which data in the file begins.
-
When the First Characters of the Previous Row Are - enter the first characters of the row before data in the file begins.
Ignore Rows
Some rows in a text file often contain labels and meta data that you want to exclude. To exclude rows from the import process, specify the number of rows you want to ignore at the End of file or After a specified row number.

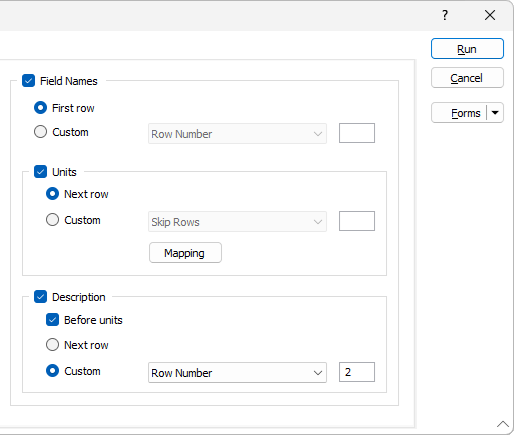
Field Names
Select the Field Names check box if the input file contains field names. Use the option buttons to select whether the field names are contained on the First Row or select Custom and use the drop down to select an option:
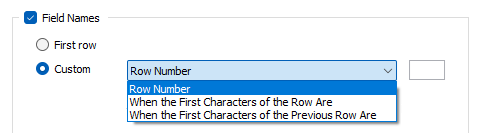
- Row Number - enter the row number at which field name are contained.
-
When the First Characters of the Row Are - enter the first characters of the row at which the field names in the file begin.
-
When the First Characters of the Previous Row Are - enter the first characters of the row before the field names in the file begin.
Units
Information on Units can be contained in exported text files. When selected, the Units check box indicates that Unit information will be imported to the application as part of this import procedure.
Use the option buttons to select whether the Units are contained on the First Row or select Custom and use the drop down to select an option:
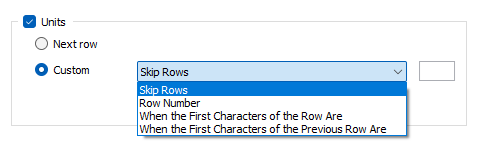
- Skip Rows - enter the number of rows to be skipped in the field provided.
-
Row Number - enter the row number at which the Unit information in the file begins.
-
When the First Characters of the Row Are - enter the first characters of the row at which the Unit information in the file begins.
-
When the First Characters of the Previous Row Are - enter the first characters of the row before Unit information in the file begins.
The Mapping button opens a form used to map the Units in the Input file with the corresponding units in the Output file. Tabs are available in the form for mapping various units such as Length, Area, Volume and Currency.
For each unit listed in the Output column for each tab, you can enter the corresponding unit in the Input column. Units not used can be left blank.
Use the Save and Close button to retain the mapping information you have entered.

Description
Information such as ppm, %ppb and more can be contained in the field descriptors from text files. When selected, the Description check box indicates that the contents of the Description field will be included in the import.
Select the Before units check box if the Description contents appear before the Units information.
By default, the import process will assume that field descriptions are contained in the Next Row, i.e. the row immediately following the field names header row in your text file. You can change this behaviour by selecting Custom and selecting an option from the drop down:

- Skip Rows - enter the number of rows to be skipped in the field provided.
Row Number - enter the row number at which the Description information in the file begins.
When the First Characters of the Row Are - enter the first characters of the row at which the Description information in the file begins.
When the First Characters of the Previous Row Are - enter the first characters of the row before Description information in the file begins.
You can configure the output information for the import using the options on the Output tab.
To import multiple delimited text files, see: Import Text (Bulk)