Filter
![]()
You can also right-click and select New to create a new filter, or select Edit (F4) to edit a filter, whenever you select a Drillhole Database in a form.
For example, you may wish to extract a subset of data comprising the collars and all related downhole data, based on a collar attribute such as a Easting. Filters are evaluated differently depending on the source data type (Character or Numeric) and the conditions specified in the Filter Conditions grid.
Mode
The Drillhole Database Filter can be utilised in Classic, Expression or Hole List mode.
- Classic mode uses the fields, operators and values specified in the Filter Conditions grid.
- Expression mode uses the field and attribute variables, functions, operators, and values specified in an expression.
- Hole List mode uses drillhole IDs from a DHDB list created in or imported to the filter.
Drillhole Database
Double-click (or click on the Select icon) to select the database you want to filter. If you are editing an existing filter, the name of the current (or the last used) database is shown in the Database input box.
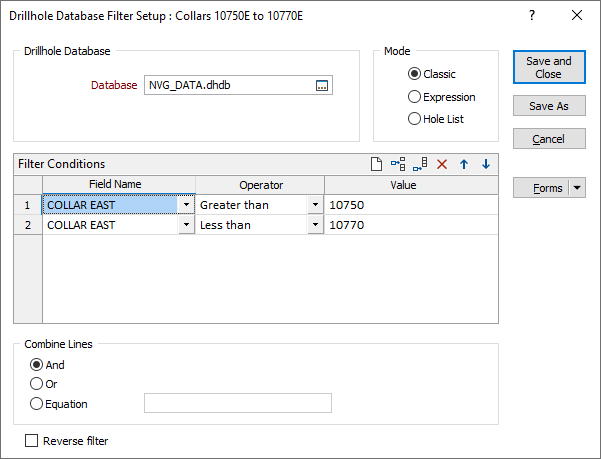
Classic Mode
Filter Conditions
For each of the required conditions, select a Field on which the condition will operate, select an Operator from the drop down list, and enter a Value to be used in the operation. Wildcards can be used when defining values. Use the buttons on the local toolbar to Manage the rows in the list.
Alphanumeric rather than string comparisons are used when non-numeric (Greater Than, Less Than, Greater Than or Equal, Less Than or Equal) filter conditions are used.
Combine Lines
(Optional) To apply more than one condition, use logical (Boolean) and comparison operators. These define how the lines of filter conditions are combined. If you use the logical operator AND or the logical operator OR, then that operator will apply to ALL filter conditions. Condition1 AND Condition2 AND Condition3 for example.
To mix AND and OR operations select the EQUATION option, build the filter conditions first and then combine the lines in the Equations field.
Reverse Filter
Sometimes it is easier to define a set of conditions for the records you do NOT want to use. Selecting Reverse filter? Will include records NOT defined by the filter conditions.
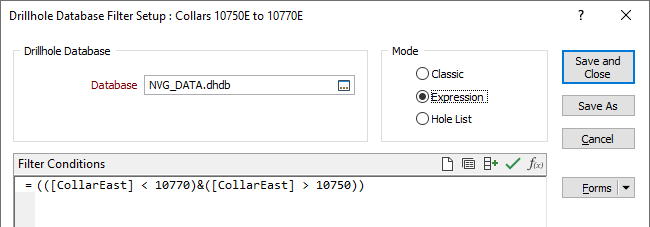
Expression Mode
In Expression mode, the Filter Conditions grid becomes a panel with expression tools enabled. Any filter created in Classic mode in this session will be displayed in the Expression mode panel when the radio button is selected - as displayed in the image which follows:

|
The Open Expression Editor icon opens the expression editor from which you can create and modify expressions to add to the filter. |

|
The expressions you create can be saved and used in creating filters using the Save this expression... tool. |
|
|
To auto-populate an expression with drillholes, you can use the Select from saved Hole lists... button in the Filter Conditions toolbar. |
The Attributes you specify on the Collar Attributes tab can be used when you want to group or classify drillholes using some non-unique identifier. This can be useful when specifying a filter, for example, to limit the display to those holes within a particular survey section.
Note that the fields defined on the Collar file tab (of the Database Properties form) are treated as per the file structure; however, the fields on the Collar Attributes tab will always be treated as Character (or Strings) by a filter expression, regardless of the source field type.
In particular, DATE functions used in expressions will require date strings to be converted to DATES using the TODATE() function. The safest way to do this is to specify the date format as a parameter to that function.
If a date format specifier is not supplied, for example, you use:
=TODATE([str])
the function will try to parse it, but the results may be unexpected. It is recommended to always provide a second argument which specifies the date format. For example:
=TODATE([str],"yyyy/MM/dd")
For more information on creating a filter using expressions, see: Expression mode.
Hole List Mode
In Hole List mode, the Drillholes grid is displayed. From the grid, you can select the drillhole IDs, by which to filter the selected database, or import a drillhole list for the filter.
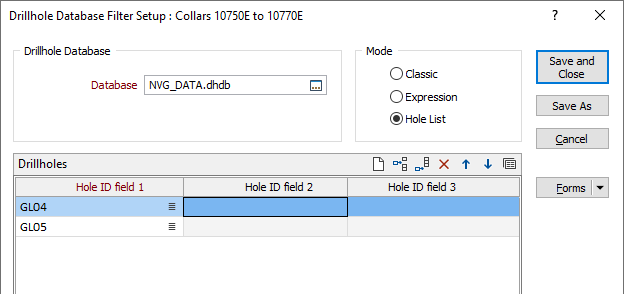
Click on the List icons to select the field(s) on each row of the grid. Alternatively, you can import a saved drillhole list to add to the filter, using the Save current form... option on the Drillholes grid.
This option will open the Forms dialog, from which you can click Import to open the Import Form Sets form. For information on how to import a drillhole list to the filter, see Import Form Sets.
Save and Close
Click the Save and Close button to save the changes you have made and close the Filter form. If a form set has been loaded and modified it will be overwritten. If the Filter form was opened in the File Editor, the filter will automatically be applied to the current file.
Forms
Click the Forms button to select and open a saved form set, or if a form set has been loaded, save the current form set.
By design, the Forms button is not available for loaded Vizex layers (i.e. when opening the form set properties of a layer in the Vizex Layer Display pane). In Vizex, the Forms button is only available for new forms opened via the Home tab or the Vizex tab, in the Layers group (or by double-clicking on a form type node in the Vizex Layer Types pane).
Save and Save As
Click the Save button to save the changes you have made to the form set. Click Save As to save your changes as a new form set. Save As will default to the first available form set number.
Reset
Click Clear to clear the form of all values and reset the form to its default state. In the case of tabbed forms, set the first tab as the active tab.
Undo and Redo
Click Undo (CTRL + Z) to undo recent changes in the form. After an Undo, click Redo (CTRL + Y) to restore the last change that was undone.
Collapse
Collapse (roll-up) the form to preview a chart, or preview the results of an operation in Vizex, or obtain input values from Vizex, the Property Window, the File Editor, or the Plot Editor.