Vizex
This
Generate Screenshot to Clipboard
On the Vizex tab, in the Capture group, the Generate Screenshot tool has been enhanced. You now have the option to:
-
Use the current screen DPI resolution, or
-
Choose a custom DPI resolution
-
Save the image to the clipboard, or
-
Save the image to a file:

Clipping Status and Vertical Exaggeration
The Clipping status and the current elevation are now shown on the status bar where they can be interactively adjusted. The vertical exaggeration display on the status bar has also been improved and now supports interactive adjustment.
Setting Vertical Exaggeration on or off via the status bar, will update the Vertical Exaggeration setting on the Vizex tab, in the Display group. This default setting will not be overridden when you load a saved view, or create a new view.
![]()

Enabling Clipping on or off via the status bar, will update the Enable Clipping setting on the Vizex tab, in the Sections group,
![]()

Shadow Sections
On the Vizex | Sections tab, in the View group, Shadow Sections can be applied to add an extra towards and away window on top of the normal window. Data outside of the normal window but inside the secondary shadow window is drawn in the colours you have selected, with some details, labels, annotations, etc. omitted.
![]()
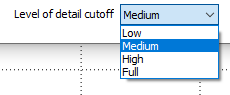
When you modify your Shadow Section Settings, you can now select the maximum allowed level of detail to be rendered. The default level of detail is Medium:
Block Model Labels
On the Home tab or the Vizex tab, in the Layers group, when you select Block Model to open a Block Model in Vizex, up to fifty labels can now be displayed for each block.
Each label annotates a different attribute (file field) of the block model. Separate colour sets can be applied to each field. You can also adjust the orientation and the offset of the labels.
![]()
Properties Pane
The Properties Pane now includes clipboard options to Copy the contents of the pane to the clipboard.
Use the options on the right-click menu to copy selected properties to the clipboard. You can then paste (CTRL + V) those properties into a text editor or a worksheet.

In order to copy a cell's value you need to right-click its label, not the value. This is because Micromine interprets clicking on a value as an attempt to edit that value, not copy it.
Copy All (without labels) may leave blank lines within the copied content. This is deliberate. Blank lines represent attributes with no values; keeping them makes it easier to align the copied contents with the properties of other items in the same file.
Image Registration
When you select select Display Layers | Image to load and georeference an image (on the Home tab or the Vizex tab, in the Layers group), a new Conversion prompt supports the picking of a coordinate system conversion for the loaded image.
![]()
Note that client-side image coordinate conversion is also supported when you setup a WMS or WMTS image (on the File tab, in the Image group).
Georeference Image
Georeference control points are now labelled with their Point ID by default, to allow for easy identification in both the Image pane and the Vizex pane.
Use the Toggle Point Indices option on the toolbar to toggle point labels on and off.
![]()
Copy Wireframes to Active Layer
In Vizex, when you right-clicking on a 3D model which is loaded with position/rotation/scale parameters, selecting Copy wireframes to active layer, will now apply triangulations with transforms to each vertex.
Annotations
You can now select an Underline text option to underline a Callout Text annotation with the arrow tail. Underlining can be toggled on and off on a per-label basis.
Note that the Underline text option is only enabled when the Vertical alignment relative to the anchor point is set to Top or Bottom.
![]()
When you create or edit an Annotation Set, you can also set a global Underline labels option on the Labels tab of the Annotation Set form. This will be the default setting when you create a new Callout Text annotation.
![]()