Hatch Sets
Hatches are applied using True Type™ fonts (TTF). There are many advantages associated with implementing hatching as True Type fonts. They include:
- Hatches can be sized based upon font point size.
- The foreground and background colours of a hatch can be controlled.
- The colour and line type of the hatch border can be controlled. This is the line that will be drawn around a hatched area such as an outline.
- Because True Type fonts are standard in Windows, they are easy to install.
- Note that unlike colour and symbol sets, you cannot save palettes of hatches.
Once you double-click on a hatch icon, you can select a hatch and define its characteristics in the Fill Pattern dialog. The first two hatches are always NO FILL and SOLID no matter which font is selected. NO FILL is used when you do not want to use a fill pattern. When you select NO FILL, Background colour and Font size are disabled, though you still have control over the border colour. NO FILL is analogous to the NULL colour in colour sets.
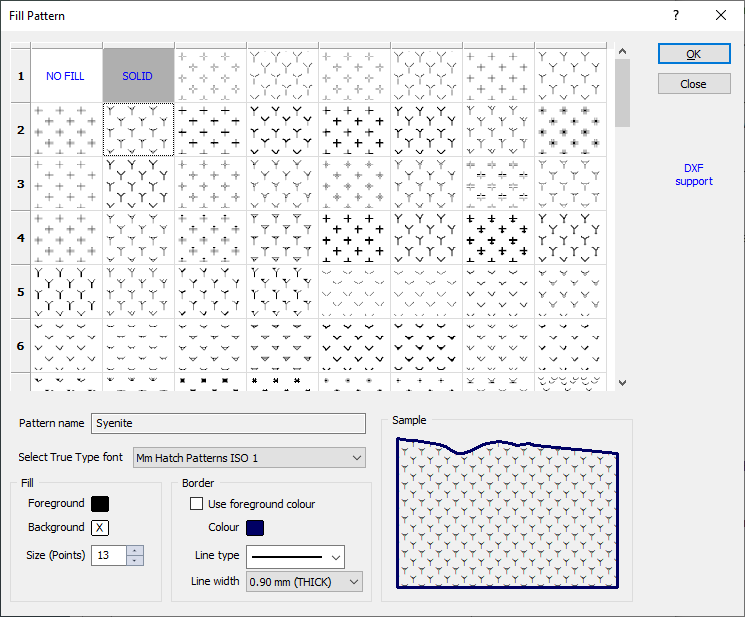
The SOLID hatch pattern fills the enclosed area completely with a solid fill.
Hatch characteristics
Scroll down the list of hatches to display the entire contents of the font.
Pattern name
Where possible, custom names are derived from geological, geophysical, and mineralogical standards and are shown as tooltips which may inform your selection.
When you select a hatch, the pattern name (if any) is shown.
Fill
You can set the foreground and background colours of the pattern, and its size. The changes will be displayed in the sample shown at the bottom right of the dialog.
Remember that 1 point (pt) is 1/72”, so 1mm is about 2.88pt. The sample in the bottom right of the selection dialog shows the size correctly. In a dialog that displays a selected hatch, the icon, representing the hatch, does not reflect the true font size.
Null backgrounds and foregrounds
A Null Foreground colour disables the Background colour and Size parameters. The effect is the same as selecting a Null hatch pattern.
A Null Background colour is effectively a transparent background. All hatches in previous versions of the application used this attribute.
To set a hatch pattern to Null, press the Delete key when the focus is set on the hatch pattern font.
When you have set the characteristics of the hatch, click the OK button to complete the process.
Border
In a display, the hatching will be clipped to a defined area, for example, an outline. You can control the colour of the line drawn around the boundary of the outline. The colour of this line can be set to be the same as the foreground colour of the hatch. This is a useful feature when the hatch foreground colour is controlled by a colour set. If you always want the border colour to be the same, clear Use foreground colour and select another colour. To suppress boundary line altogether, select NULL as the border colour.
You also have a choice of line styles in which to display the extent of the hatched area. The actual thickness of these lines in a plot is defined in the Plot Editor.
Plotting and printing issues to do with hatches
- Because True Type fonts are being used, output is restricted to Windows printer drivers (Print Manager). PGL files will only include the hatch border.
- Some printers will not print the TTF hatching if the hatched polygon is too complex. In such cases set Print text as graphics in the printer options.
- If you send a plot containing hatches to another computer where the fonts containing those hatches are not installed, the results will be unpredictable.
DXF Support
When exported to a file in DXF/DWG data file format, the hatches highlighted in blue are natively supported.