Geobank Logging Integrator User Instructions
These instructions describe how to Logging Integrator users can select a profile, view data and perform other tasks in the app.
Selecting a logging profile
The Geobank Administrator must first set up the logging profiles (see Administration). These will then be the pre-configured logging profiles which Logging Integrator users can work with.
To select a logging profile:
-
Open The Logging Integrator App
-
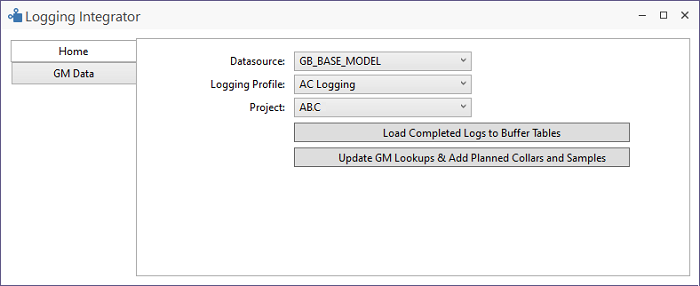
Select the Datasource if you have more than one content database in your Geobank system.
-
Select the logging profile to work with.
Viewing the Geobank For Field Teams data
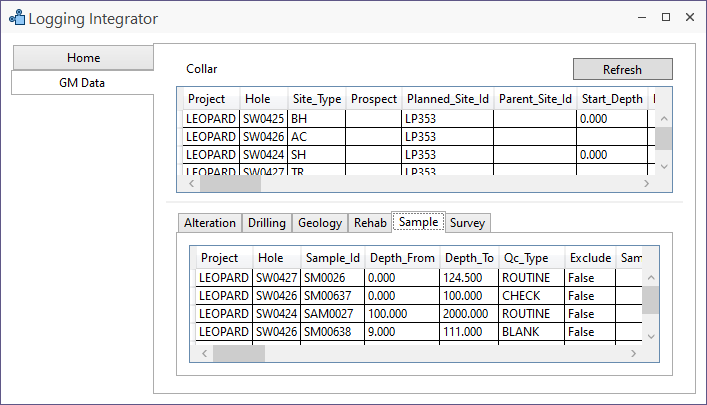
Use the GM Data page to view the latest collective synced data from all loggers.

-
Press Refresh to update this data
This shows all synched data whether or not it has been approved. The Status for each record (Blank, In Progress, A for Approved, E for Exported) is displayed in the right-most RowStatus column.
Retrieving completed logs from the field logging team
The Geobank administrator will have set up the system so that all logging personnel collecting data in the field are regularly synchronising their data to a central "Sync database".
The system will require the loggers to either Approve or Export data to mark it as complete and ready for handover to the data manager
To retrieve completed data and bring it into the buffer tables:
-
In the Logging Integrator App, Select the Profile then click "Load Completed Logs to Buffer Table". This will:
-
Load the data into your buffer tables and,
-
Mark it as locked so the logger knows their handover has been received and then can no longer edit the data
-
Once the data is in the buffer,
-
Proceed with your standard BAU process to validate and promote the data.
When data has been promoted, you can advise the loggers that they can use Purge Locked Data so they see only current data.
How to Update GM Lookups and Add Planned Collars and Samples
The Geobank administrator will have set up the system so that one or more of Lookup, Planned Collars and Planned samples can be push out to the loggers.
If only lookups codes are kept synchronised, the planned collar process below is not needed.
-
After any lookup codes are added or the GM_CODE or ACTIVE flags are changed:
-
Click the Update GM Lookups & Add Planned Collars and Samples button to send the latest details for the loggers to pick up on their next synchronisation.
-
To use the planned collar and sample functionality:
-
Firstly, carry out your BAU process for planning drillholes and sample sheets / cut-sheets.
This may involve planning in Micromine, followed by import to Geobank; or planning in Geobank using the "SITE_STATUS" of Planned or similar.
Once one or more projects have some planned drillholes (collars), those project codes will show in the Project drop-down list in the Logging Integrator App.

-
Select the relevant project from the Project drop-down.
-
Click the Update GM Lookups & Add Planned Collars and Samples button.
These planned collar and sample templates will show in the logger Geobank profiles when they are next synchronised.
Once you have filled in the additional data required, change the status and approve/export to handover the completed logs.