Scheduling Jobs/Tasks
In order to schedule jobs/tasks using the Job Scheduler, you must first add one or more computers (reference to applications servers) which will be used to run Micromine Geobank to carry out the tasks. This can be your machine or another server. To add computers to your Job Scheduler, follow the procedure outlined in Adding a Computer (Reference to an Application Server).
A job/task in Micromine Geobank is a process or procedure which performs a specific function - such as running a report or maintaining a database. The available Micromine Geobank tasks of the supported types can be scheduled to run unattended on configured computers using the Job Scheduler.
Note: details of unattended jobs performed by Micromine Geobank are written to the log file to assist in diagnosing any issues.
In the Configuration Manager, select User Interface | Automation | Job Scheduler to open the Job Scheduler.
-
Click the
 New button in the Job List panel at the right. The tabs below the Job List are enabled.
Job
-
Enter an identifying name for the task in the Name field.
-
Enter a description of the scheduled job in the Description field.
The user credentials under which the job is to be performed must be entered in the provided User and Password fields.
Tip: Enter the password as the last item before selecting the green tick to save your changes, because the password clears when other edits are made. This is for security reasons: The password is passed directly to the application server's Windows Task Scheduler to authorise the change, it is not stored in the database at Job level.
-
To select a user from the network, click the Select User button. The Select User dialog opens.

-
Enter the user name in the field provided.
-
Click Check Names to verify the name entered.
-
Click OK to add the User field in the Job tab.
-
Enter the password for the selected user account in the Password field.

Trigger
The Trigger tab is used to configure the settings for when and how often the scheduled job should occur.
There are several settings available, and the subsequent options are dynamically displayed according to selection. Detailed information on the settings is contained in Trigger.
-
Select the relevant radio button to configure the trigger options.
For example, to configure a database backup every week, select Weekly. -
Set the schedule using the options provided at the right. These options will differ according to the chosen setting.
In this example, with Daily selected, set the Start Date and Time and enter 1 for the Recur every _ days setting (e.g. today at 5:30:00 PM).

Advanced settings
The Advanced settings options on the Trigger tab enable the further configuration of the schedule, including delay and expiration values. Information on the settings is contained in Advanced settings.
Action
The Action tab is used to configure the task to be scheduled and any relevant parameter values. Information on the options in the Action tab is contained in Action.
The Profile drop down is used to select the user profile (as configured in Micromine Geobank Profiles) under which the task to be scheduled is enabled. If you don't know which profile your required task is categorised under, you can search for it by name using the Search button.
In the case of this example,
-
Select the DB Admin profile.
The Task List drop down allows you to select a category under which the task to be scheduled is contained. In this example,
-
Select the DB Maintenance list from the drop down.
Finally,
-
Use the Task drop down to select the task to be scheduled - in this example, Create Database Backup.
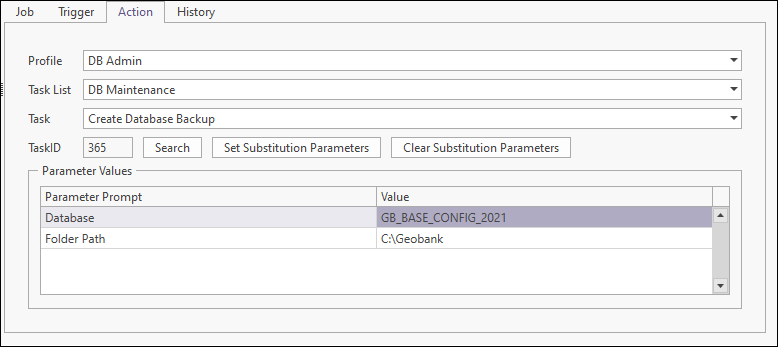
The TaskID field is automatically filled with the ID for the task selected in the Task drop down.
In this example, a database to be backed up, as well as a destination folder for the backup file needs to be configured. This is achieved using the Set Substitution Parameters option. Where a task selected for a schedule does not require any further configuration, the Set Substitution Parameters option will not be enabled.
To set the parameters for the Create Database Backup task,
-
Click the Set Substitution Parameters button.
A form is opened, relevant to the scheduled task. In this case, the Create Database Backup Parameters form opens.

In this example, the Database to be backed up and the Folder Path in which the backup is to be stored must be configured. To do this,
-
Click the ellipsis in the Database field to open the selection form.

-
Select the database for the backup from the list. In this example, select the MODEL database.
-
Click OK to add the selected database to the form.
With the database selected, you can now specify where you want the backup files to be stored. To do this,
-
Click the ellipsis in the Folder Path field.
-
Navigate to the required folder in the Browse for Folder form and click OK.
When the database and the folder path have been configured,
-
Click OK in the Substitution Parameters form.
The configured parameters are displayed in the Parameter Values grid at the bottom of the Action tab.

With the job schedule configured as required,
-
Click Save at the top right of the Job List.
The details of the task schedule are saved and the job will be run on the configured computer at the specified time.
Events that occur for the schedule, such as when the scheduled task is registered, the next run time and last run time, and the category of the event are all collected in the event log for the Job Scheduler, displayed in the History tab.

For information on any issues that may arise, see Troubleshooting.