Drill Core Image Adjustments
When records in an image interval table are adjusted, appropriate metadata can be set or edited to define how the core image should be rendered to represent the adjustment made.
Pre-requisites
In order to render and save adjustments in drill core images, a number of perquisites must be met.
-
Core-stick images must exist for the drillhole (either manually or automatically extracted from core tray images or from hardware which generates these)
-
An interval table must link images to depths AND have a field in which saved metadata can be stored
-
A depth adjust tool must have been configured with a Core image (Bar) panel
-
The relationship of images and intervals must be considered:
-
One image can be used in many intervals
-
An interval can have no image (a core-loss gap)
-
The case of one interval with many images is not supported
-
Workflow
The following outcomes are desired:
-
Validation of pre-adjustment depth
-
Cut images at some of the natural breaks in order to carry out adjustments
-
Insert core loss gaps/intervals
-
Stretch or compress broken core or 'false-core' intervals so that the image fills the correct depth range
-
Shift intervals (around gaps) to match meter marks to depth scale
-
Tray level shifts
Note: Adjustments usually occur within the depth_from and depth_to values of a tray, because these are measured depths captured by the drilling team. There are a few cases where these from and to values for a tray are not correct:
-
Labelling or file-naming errors - best corrected before the depth adjust process based in depth interval validation - gap, overlap, negative width.
-
Wireline data provides more accurate depths, revealing drillers depth are sufficiently incorrect as to need adjusting - best corrected after the in-tray adjustments using a large-range fixed width adjustment.
-
-
Recommended Steps
The following steps for drill core image adjustments are recommended for users. A configured Depth Adjust tool should be opened.
Cut Images
-
Use the Insert by range tool with zero width and default CL code to cut composite images at natural breaks
-
Repeat as needed for other cuts
-
Save the changes to the depth adjustment.
Insert Core loss
-
Select the interval below/above broken core sections and use Insert Above or Insert Below to add core-loss intervals.
-
Repeat as needed to add more core loss.
Note: Insert range can be used to cut and insert core loss to the lower image in one action.
Note: Having an image of the core tray with the wooden blocks on which core-loss and depth notes are recorded would be valuable to the user as a reference while adjusting depths.
-
Save the changes to the depth adjustment.
Stretch or compress
-
Lock an interval range to stretch or compress plus core-loss interval(s) above and/or below
-
Use one or two normal snapped tie-lines to specify the required change
-
Click Apply All to apply the changes.
-
Save the changes.
-
Repeat these steps as required.
Note: A 'false-core' is part of an image that the 'system' (a human, hardware, future-core-extractor' etc.) has picked up as core, but it is in-fact something else, such as a shadow, grains, a stain, dirt and so on, so it should be removed (or compress to minimal size).
Align depths
-
Lock a range with a core-loss interval at top and bottom.
The selected range can contain one or more image intervals.
-
Use unsnapped fixed tie-lines;
-
place the first fixed tie-line to align the meter mark with the depth scale
-
-
Switch to Snapped tie-lines and add two more fixed tie-lies: below the top core-loss and above the bottom core-loss.
-
Click Apply all.
-
Save the changes.
-
Repeat these steps as required.
Delete Interval
To delete an interval, do not use the Delete Interval tool, because the image on other intervals could become ambiguous. Instead;
-
Update the interval to a width of zero.
Technical Note
Based the formulae for cropping images, the rendering requirements can be met by catering for the storage of these metadata attributes:
-
The existing depth from and depth to data
-
The new image_from and image_to data (not adjusted)
-
The new Crop Upper and Crop Lower metadata (factor or percentage)
The representative formulae for rendering are:
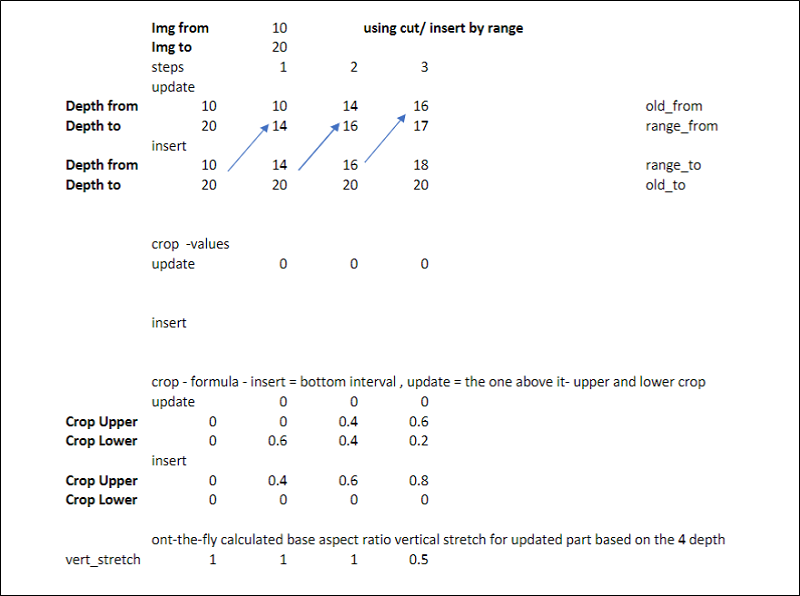
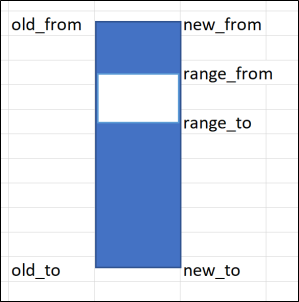
The following is a visualisation of values for insert by range:
Standard or fixed tie-line
For an existing interval which is updated:
-
No changes to cropping metadata
-
Rendering is only required for the on-the-fly base aspect ratio stretch calculation: (new_to - new_from )/ (image_to - image-from)/ (1 - (crop_upper+crop_lower))
-
After saving and then reloading, this on-the fly calculation becomes the same as any interval: (old_to - old_from )/ (image_to - image-from)/ (1 - (crop_upper+crop_lower))
-
Insert by range/Cut
For a new interval inserted based on an exiting interval: (new interval is from range_to to new_to)
-
new_crop_upper = 1-(1-(range_to-new_from)/(img_to-img_from))+(old_crop_upper)
-
new_crop_lower = 1-(1-(old_to-new_to)/(img_to-img_from))+(old_crop_lower)
-
on-the-fly base aspect ratio stretch calc: (new_to - range_to )/ (image_to - image-from)/ (1 - (crop_upper+crop_lower))
-
After saving and then reloading, this on-the fly calculation becomes the same as any interval: (old_to - old_from )/ (image_to - image-from)/ (1 - (crop_upper+crop_lower))
-
For an existing interval which is updated at the same time as the insert above is applied (updated interval is from new_from to range_from and represents the portion of the image which was new_from to range_to)
-
new_crop_upper = 1-(1-(new_from-old_from)/(img_to-img_from))+(old_crop_upper)
-
new_crop_lower = 1-(1-((range_to-new_tofrom)/(img_to-img_from)+(old_crop_lower))
-
on-the-fly base aspect ratio stretch calc: (new_from - range_to )/ (image_to - image-from)/ (1 - (crop_upper+crop_lower))
-
After saving and then reloading, this on-the fly calculation becomes the same as any interval: (old_to - old_from )/ (image_to - image-from)/ (1 - (crop_upper+crop_lower))
-
For a new interval not based on an existing one: This is a core loss interval, so does not reference an image: (inserted interval is from range_from to range_to)
-
new_crop_upper = 0
-
new_crop_lower = 0
-
on-the-fly base aspect ratio stretch calculation: 1
-
After saving and then reloading, this on-the fly calculation becomes same as any interval: (old_to - old_from )/ (image_to - image-from)/ (1 - (crop_upper+crop_lower)) which = 1
-
Before any further changes, the previous example becomes:
